food · Home & kitchen · Interests and Hobbies · Life · Product review · Recipes

Galleoneers recipe kit review

Being a busy working mum, I love the idea of having a subscription recipe kit which is tailored for children. It’s a good idea for them to take interest in the kitchen at a very young age while I’m there to help them which will also create a special memory of bonding. My kids are a bit fussy when it comes to foods hence Galleoneers recipe kit is the perfect way to enjoy cooking and spend family time. I’m hoping that cooking with them will help them to have a positive relationship with food so that they can make a healthier choice.

About Galleoneers

Galleoneers is a subscription of recipe kits for kids aged between 3 to 12 years old. Their recipe kits teach your kids to appreciate diverse cuisines around the world. What I love about Galleoneers is that it comes with 3 recipes which include starters or snacks, mains and desserts which will help my kids to learn varieties of cooking and food preparation. Galleoneers also offer alternative recipes ( through their cooking club ) so you can have more option and also good for people with specific diet.

Japanese themed recipe kit

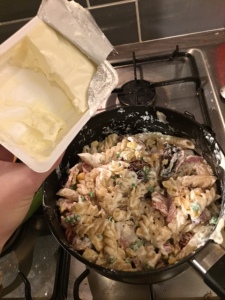
We were sent a ” Japanese Theme ” recipe kit which pack in a small box with a beautiful themed design. My boys were excited to open the box. Inside is a beautifully wrapped recipe kit. It is well packaged so would make a great gift. The recipes to make were sushi, chicken yakisoba and red beans ice lolly. The recipe kit also comes with seaweed sheets, sushi rolling Mat, wooden spatula and origami sheets for arts & craft activity.

Grocery shopping for the ingredients

When my recipe kit shipped, the list of ingredients were emailed to me to buy and a grocery shopping list is also included in the kit. Alternative ingredients can also be found in the book which is very helpful and flexible. I took my youngest child with me in buying the ingredients which is fun. He help me find the stuff needed and I let him hold the grocery list. It is also a good way for him to get to know the name of the ingredients such as those avocado, spring onion and asparagus.

Starter

Japanese sushi

It’s our first time to make sushi and my boys ( 6 and 3 years old ) really enjoyed making it. The instruction were easy to understand and follow. My boys had fun as if they were playing. Our sushi doesn’t look perfect but what matters is that my boys loved it.

Main

Chicken yakisoba

My daughter did the cooking of the chicken yakisoba since she loves noodles. She enjoyed doing it all herself without any help from me. She easily followed the instruction since she is 14 years old which is above of the age recommended for the recipe kit which is 3-12 years old. She likes learning to cook from recipes which is wonderful. She find the recipe interesting and fun to cook.

Dessert

Red beans ice lolly

My 3 years old son took interest in making the ice lolly. He was cute and charming as he patiently waited for my instruction as I help him to make the ice lolly. He looked at the picture in the booklet and said are you ready mommy? Oh bless him…He was really keen in helping making foods in the kitchen and he found it so exciting and fun doing all the mixing. He even put them in the freezer by himself.

What do we think about the Galleoneers subscription recipe kit?

I thought it’s a brilliant idea. I would never thought I would have fun cooking with my children. Having a recipe kit which is simple and easy to follow is wonderful for children to get them involved in the kitchen. It is also good for a quality bonding time as a family. The price seems to be a good value of money considering it comes with a 3 recipe compare to other subscription recipe kit that only comes in one, however it would be nice if the more unusual ingredients were included, as I struggled to find some of them. It also included a free exclusive membership to their cooking club.

The subscription box price

Subscribe to Galleoneers

3 months for £27.75

6 months for £54

12 months for £105

Single recipe box is available for £9.99 plus shipping. They shipped every 22nd of the month.

Recipe box includes :

• 24-page fully illustrated recipe and activity book

• 2 kitchen tools

• Some of the food ingredients

• Arts and craft materials

Plus, you get a free exclusive membership to Galleoneers Cooking Club for one month

£9.99

Disclaimer : The recipe kit and ingredients were provided by Galleoneers for the purpose of this review. However, all thoughts and opinion are mine.

food · Life

Rice, fish and vegetable combo 

You probably know by now that we Filipinos eat rice everyday and it’s 3 times a day. This is a typical style in the philippines, rice with meat or fish and vegetable dish. Hence, I’m showing you an example of a filipino meal.

For this one it’s a combination of fried fish and vegetable dish serve with rice.  Continue reading “Rice, fish and vegetable combo “

food · Interests and Hobbies · Life

Filipino Bibingka or rice cake | #foodiefriday

I wanted to share with you one of our native food from the Philippines which is called bibingka. This is a sweet food that made with glutinous rice and coconut milk but since I don’t have a complete ingredients I just try to recreate it. I have learned this through my sister inlaw who loves cooking. 

Ingredients :

  • Glutinous rice
  • Coconut Milk
  • Condensed milk as a substitute to sugar and to caramelised it on top
  • Banana leaf ( you can buy it from the Asian shop )
  • Coconut string (optional )

Procedure :

  • Mix coconut milk and condensed milk to the glutinous rice and mix it.

  • Put some oil on the banana leaf to avoid sticking 
  • Put the mixture on it and put it in the oven for 180 degree Celsius for 10 minutes you can see when it’s cook. 

  • When it’s nearly cook add condensed milk on top to caramelised it then put it back in the oven for another 5-10 minutes till it gets brown 

  • Once cook take it out and you can eat it while it’s warm or when it has cool down.

  • This is what it looks like if you add it with coconut string. Enjoy!
food · Interests and Hobbies · Life · Live, love, laugh

Filipino mango ice candy or ice lolly | #foodiefriday

Since it’s summer, we want something cold and refreshing. It remind me of the filipino style ice candy or similar to ice lolly

So I thought I would try to create one and flavoured it with mango.

Ingredients :

  • Ripe fresh Mango or mango slice from the tin
  • Evaporated milk or water ( optional )
  • Condensed milk 
  • Mango flavourings ( optional )
  • Double cream 
  • Ice candy bag ( bought it from the philippines ) not sure where to get it here in the uk

Procedure :

  • Purée the mango 

  • Add condensed, evaporated milk and double cream to the puréed mango 

  • Blender the mixture and put it in the ice candy bag and freezer it. Once it hardened you can enjoy your flavoured mango ice lolly. It taste like a milkshake or ice cream. The texture is super soft. 

    food · Interests and Hobbies · Life · Live, love, laugh

    Chicken Thai curry | #foodiefriday

    A Thai catering service is selling food at a market day every Wednesday at local high street near us. My favourite to buy as a take away is their pork Thai curry.


    Then I saw this Thai red curry sauce from aldi and I thought I might as well try to cook it myself and I’m impress with this sauce as it gives the same taste of curry from that Thai food stall. Since then I never looked back and always use this sauce.


    Ingredients:

    • Chicken breast
    • Thai red curry sauce
    • Green beans
    • Pepper
    • Chilli

    Instruction :


    Slice chicken breast and fry it with cooking oil until it gets brown


    Add the Thai red sauce


    Add a little bit of water if you want maybe half cup, simmer and keep mixing it maybe up to 5 minutes until meat are tender / cook.


    Add a spring beans ( Iv used a frozen one as fresh one not available that time )


    Add peppers


    When vegetables are cook, turn off the heat and add either a fresh chilli for that added taste ( optional )

    Best serve with rice.

    Mummy in a Tutu
    food · Recipes

    Salted caramel mocha cake

    I got the basic recipe for a mocha marble loaf from here

    Ingredients:

    • 175g butter, softened
    • 175g caster sugar
    • 3 eggs, large
    • 175g self raising flour
    • 2 tsps of instant coffee dissolved in 1 tbsp boiling water
    • 2 tbsps cocoa powder mixed to a paste with a little boiling water

    I won’t walk you through the cake batter recipe; cream the butter and sugar, add eggs, fold in flour.

    Split into two bowls, add the cocoa powder mix to one and the coffee mix to the other.

    Layer into the loaf tin and using a skewer zigzag the mixture so it marbles. Cook at 160 Celsius for 55 minutes.


    Once cool slice the cake in half.


    Mix some butter icing up, I don’t measure I just stick some in until the icing looks right. I then added some Monin salted caramel coffee syrup.


    Layer the icing across one half and pop the lid back on:


    Melt a Lindt salted caramel bar or rolos in the microwave, add some boiling water and mix in some icing sugar. Stab holes in the top of the cake and drizzle the glaze over the top. Mash some more Lindt bars or rolos and decorate the top with them.

    Mummy in a Tutu
    food · Recipes

    Deluxe Cheesy-pasta #foodiefriday #recipe

    I adore easy to cook meals and this one is so simple!

    pasta

    bacon

    halloumi

    onion

    frozen peas

    tinned sweetcorn

    soft cheese (Philadelphia or equivalent own brand version)


    Pre-cook the bacon, onion and halloumi and in a separate pan boil the pasta and frozen peas and sweetcorn

    img_2818

    mix all together and add the soft cheese

    img_2819

    Stir well and grate some cheese on top if you like, and serve!

    img_2820

    The great thing about this recipe is that you can add whatever you like, put chicken in, other vegetables, new potatoes or rice instead of pasta, use the flavoured cheeses (garlic and herb, black pepper etc), add milk or cream if the sauce is too thick. It is really yummy, but really quick and easy.

    Mummy in a Tutu
    Fitness · food · Recipes

    Juicer Recipes; cheap and easy! #foodiefriday

    As part of my new year’s resolution to be a healthier I bought myself a juicer from Gumtree, all of £10! I absolutely love it; it is quick and easy to juice the fruits (although it is a bit noisy), I don’t need to skin or core the fruits because the juicer removes all the pulp and there are no seeds from raspberries etc which would definitely annoy me. The worst part is cleaning it, although the parts are dishwasher safe if I actually put it in there I wouldn’t have space for any dishes lol so I handwash it every day (I can see this getting boring after a while and I will stop bothering to use it).

    But for now I am enjoying trying out new mixtures of fruit for breakfast and here are a few of our favourites; I try to use every day fruit and veg (the pineapple and melon were in the reduced section!) and I made enough for 2 glasses of each mix:

    img_2788 3 apples, 1/2 lemon and an inch of ginger

    img_2789Much like pure apple juice, but with a bite to it. Very yummy!


    img_2815Inch of pineapple, 2 carrots and 1 orange

    img_2866Very tropical, the kids really enjoyed this one.


    1/4 of a melon (I take the skin off but apparently you don’t have to) inch of ginger, 1 carrot, 1 orange

    Couldn’t taste the melon, it was all orange juice with a bit of bite to it.
    My top tips are:

    • Carrots thicken it up nicely and are cheap
    • Ginger goes with everything, so tasty
    • Don’t bother with melon or other slight flavours
    • Don’t have too many apples or pears, they make the kids poop (a lot!)
    • Mummy in a Tutu
    food · Recipes

    Hassleback potatoes #foodiefriday

    These potatoes are crispy on the outside and fluffy inside. Amazing!

    Potatoes (new potatoes work best)

    Butter

    Olive oil

    Slice the potatoes as low as you can without slicing through


    Melt the butter and mix with some olive oil. Roll the potato in the butter/oil mix


    Place on a baking tray, sliced side up and pour the remaining butter/oil mix


    Roast in the oven (180 degree c) for an hour.

    So easy and so yummy!

    Mummy in a Tutu